First-Trip Checklist for a New Travel Trailer
The 12 Things the Dealer Walkthrough Skips

First-trip order of operations
- Tires, lugs, height Cold psi from placard Blowout, wheel loss
- Hitch, chains, breakaway Cable to truck Runaway trailer
- 7-pin and brake gain Manual override test Weak or locking brakes
- Re-torque lugs en route Axle maker's schedule Studs seated, nuts loose
- Chock, then unhitch Level side-to-side first Trailer rolls
- Test pedestal, connect EMS, regulator on Miswired post, burst line
- First-night checks Detectors, breakers, furnace Silent detector
Watch it done
Videos are from the channels named, not Chock & Level. Where a video and your manual disagree, follow the manual. Playing a video loads YouTube, which sets its own cookies.
The dealer walkthrough covered the awning switch, the slide button, and how to dump the tanks. It probably did not cover lug nut re-torque, how to set the brake controller, or what a miswired campground pedestal does to a new converter. Those are the things that end first trips early.
This is the order to work in, from the day before you leave to the first night. The life-safety items are tire pressure, lug torque, the breakaway cable, and the trailer brakes, so they come first. The rest protects the trailer’s systems from the most common first-trip damage: a dry-fired water heater element, a burst fitting from high campground water pressure, and a converter cooked by a bad pedestal.
Plan on two to three hours the day before. You need a tire gauge, a torque wrench with the right lug socket, chocks, a pedestal tester or EMS, and a pressure regulator. A printable version of the whole list is at the bottom.
Quick answer. Before you leave: tires to the placard's cold pressure, lugs torqued to the axle maker's spec, breakaway cable on the truck (not the chains), chains crossed, lights and brakes tested, brake controller gain set with the manual override. Re-torque lugs at the intervals in the axle manual. At the site: chock before unhitching, test the pedestal before you plug in, regulator on the water, black valve closed. First night: press every detector's test button and find the breaker panel.
Before leaving the driveway
1. Tire pressure to the placard, checked cold
Trailer tires run at the cold inflation pressure on the trailer’s tire placard (usually on the front left of the body) or the tire’s sidewall maximum, whichever your trailer maker specifies. ST trailer tires are commonly inflated to the sidewall maximum, typically 50 to 80 psi depending on load range, because their load rating is calculated at that pressure. New trailers often sit on a dealer lot for months, and tires lose a few psi a month.
Check them cold, before the sun is on them and before driving. A pressure check after 30 miles reads several psi high and tells you nothing. Under-inflation is the root of most trailer tire failures, and it does damage to the sidewall before you see anything.
2. Lug torque now, and again at the axle maker’s intervals
New wheels seat against the hub over the first miles, and lug nuts that were tight at the dealer can lose clamp. Torque them in a star pattern to the value in your axle or wheel manual. For 1/2 in studs that figure is typically in the 90 to 120 ft-lb range, depending on steel or aluminum wheels; use your number, not this range.
Dexter’s manual calls for tightening in stages and re-checking torque at the first 10, 25, and 50 miles. Lippert gives a similar early re-check schedule. Many owners also re-check at 100 miles. Keep the torque wrench in the truck. An impact gun is not a torque tool and over-stretches studs.
3. Hitch, safety chains, breakaway cable
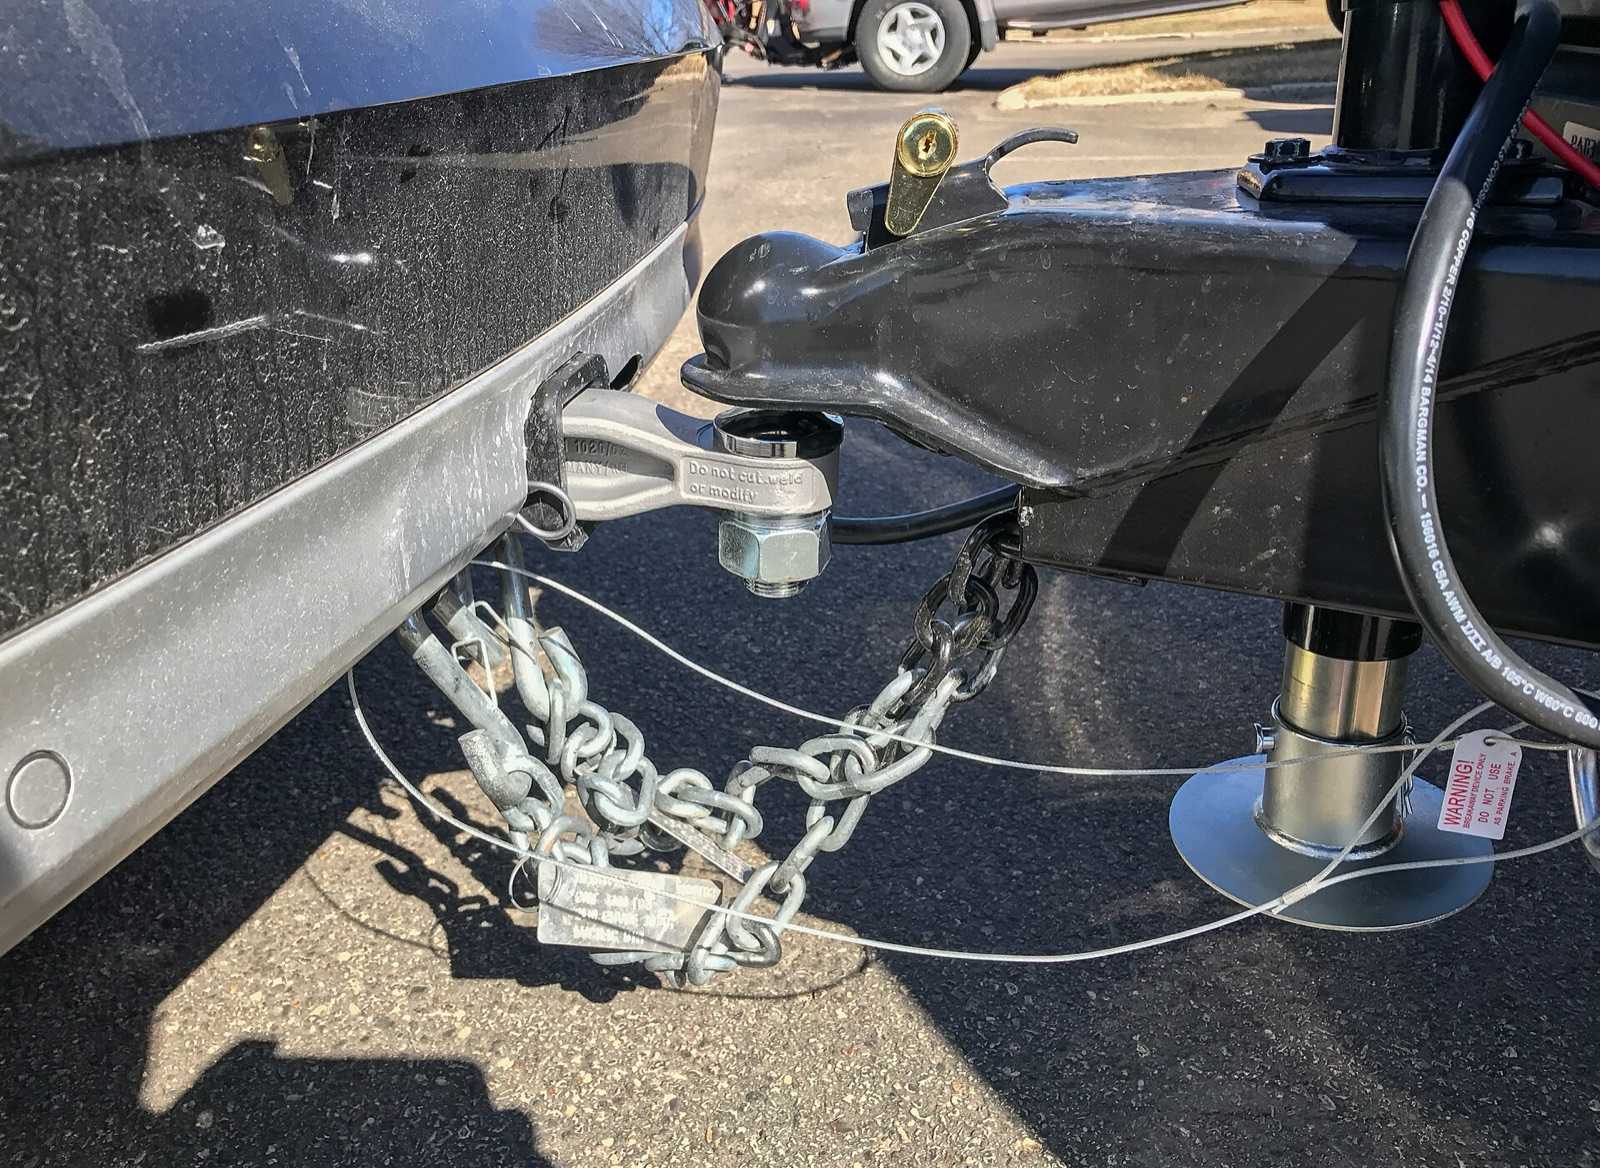
Coupler latched and pinned, ball size matching the stamping on the coupler. Safety chains crossed under the coupler, so they form a cradle that catches the tongue if the coupler lets go, with enough slack to turn but not to drag.
The breakaway cable goes to its own attachment point on the truck: the receiver’s loop or the hitch, not a safety chain link and not the chain hooks. If the trailer separates, the chains are supposed to hold it, and a breakaway cable clipped to a chain never gets pulled. Leave enough slack that it doesn’t pull the pin on a tight turn.
Then test the breakaway battery. With the trailer unplugged from the truck, pull the pin and try to roll the trailer forward a few inches with the truck; the brakes should drag hard. Put the pin back immediately, since the breakaway battery drains fast with the magnets energized.
4. The 7-pin, lights, and brakes
Plug in and walk the lights with a helper: running lights, left and right turn, brake lights, reverse if wired. A 7-pin tester from the auto parts store works alone. A flickering light here is usually a dirty pin or a weak ground, and it gets worse on the road.
5. Brake controller gain, set with the manual override
The trailer brakes do most of the trailer’s stopping, and a controller left at the factory setting is a guess. Proportional controllers like the Tekonsha P3 or CURT Echo/Discovery all use the same method, in their instructions:
- On a dry, level, empty road or lot, drive at about 20 to 25 mph.
- Squeeze the manual override lever or button all the way, without touching the truck’s brake pedal.
- You want firm braking just short of wheel lockup. If the trailer wheels lock, turn the gain down. If the stop is weak, turn it up.
- Repeat until it’s right, then test once with the brake pedal.
Gain changes with load, so redo it when the trailer is loaded differently. If the manual override does nothing, stop: the trailer has no brakes, and that’s a wiring or magnet problem to fix before towing.
6. Mirrors, height, and propane rules for the route
Extend or clip on towing mirrors so you can see down both sides of the trailer. Measure the trailer from the ground to the highest point, usually the air conditioner shroud, and write it on a label inside the truck. Typical travel trailers run 10 to 11-1/2 ft; drive-throughs and older overpasses can be lower.
Propane: some tunnels and ferries require the cylinder valves closed, and a few prohibit propane entirely. Check the rules for your route. Many people also run with the cylinders closed and the fridge on battery or off; that’s a choice, but know which way you’re running.
If you plan on hitching with a weight-distribution hitch, set it up and measure it before the trip, not in the campground lane. The WDH setup guide has the sequence.
7. The fridge pre-cooled, the water heater full before power
An absorption fridge (Dometic or Norcold) takes typically 8 to 24 hours to reach temperature. Turn it on the day before, empty, with the trailer level.
The water heater is the classic new-owner mistake. Check that the bypass valves are in the normal position (water flows into the heater, not around it), then fill the system and open a hot faucet until water runs steadily with no air spitting. Only then turn on the electric element or the gas. An electric element run dry burns out in seconds. On a Suburban heater, confirm the anode rod is installed, since dealers sometimes leave it out after winterizing; Atwood/Dometic aluminum-tank heaters don’t use one.
8. Fresh tank sanitized, holding tanks nearly empty
A new trailer’s fresh tank and lines have sat with whatever was in them since the factory or dealer winterized them. Sanitize the fresh tank before you drink from it; the method is in the dewinterize and sanitize guide.
Travel with the grey and black tanks empty except for a few gallons of water in the black tank, so solids don’t land on a dry tank bottom. Carry fresh water only as much as you need: at 8.3 lb per gallon, a full 40 gal tank is over 330 lb, and where it sits changes tongue weight.
At the campsite
9. Chock, level side to side, then front to back
Chock the trailer wheels on both sides before you unhitch. Then level side to side first, using leveling blocks under the low-side tires. Once it’s level that way, unhitch and use the tongue jack for front to back.
The stabilizer jacks go down last, just snug to the ground. They are stabilizers, not lift jacks; using them to level or lift the trailer bends them and can tweak the frame.
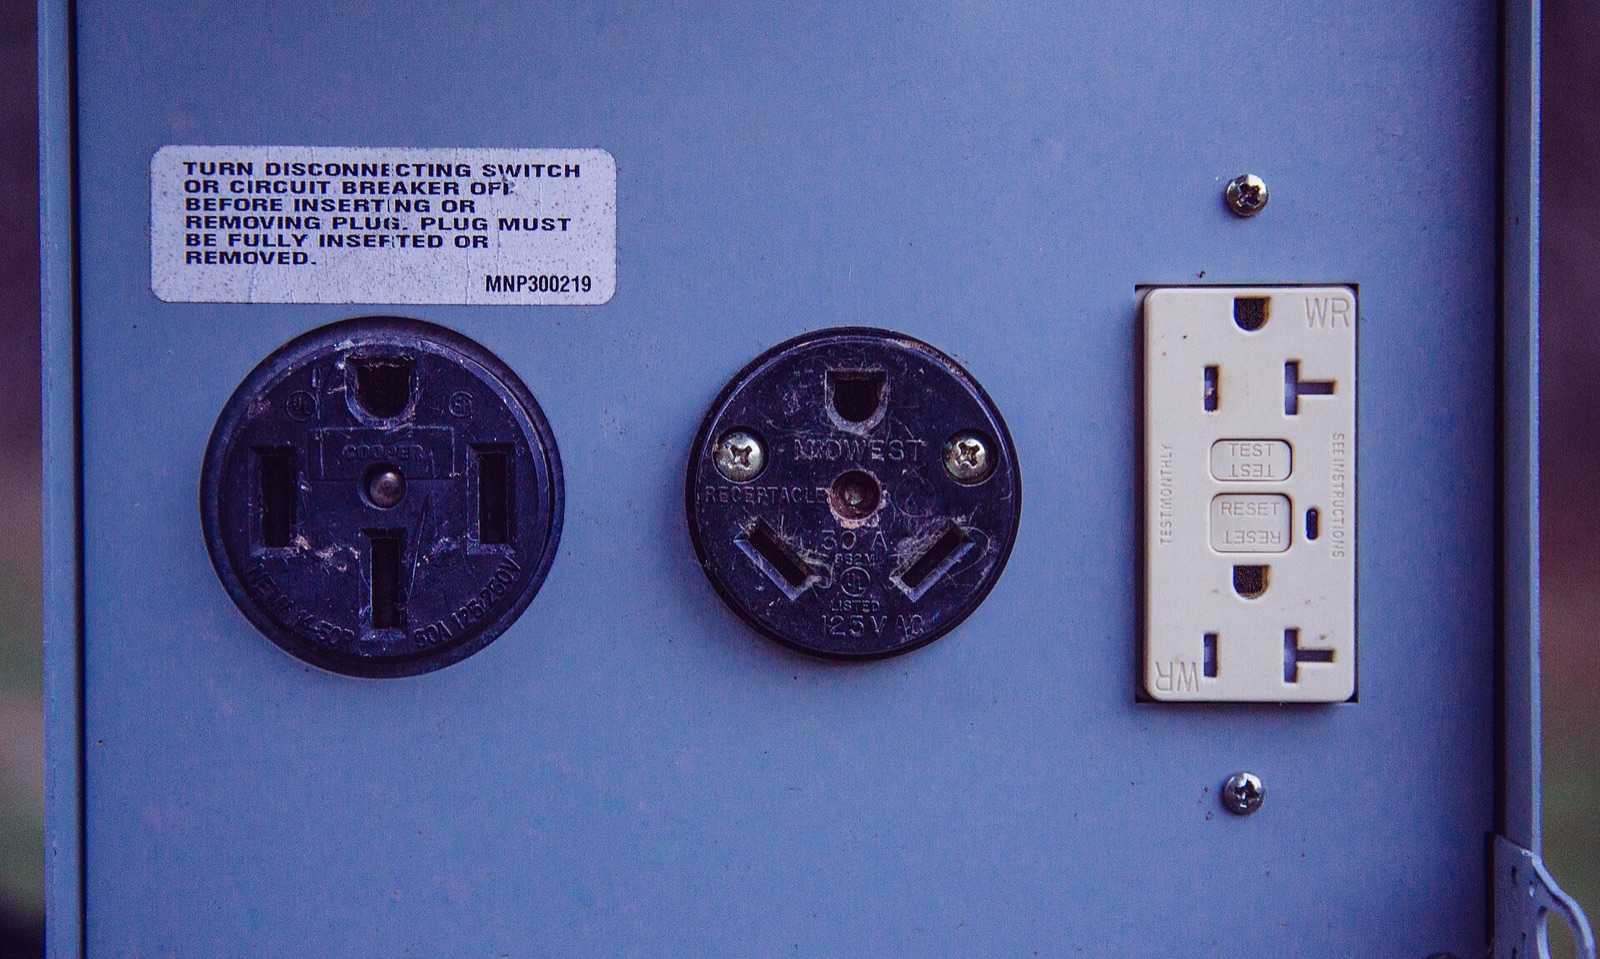
10. Test the pedestal before you plug in
Turn the pedestal breaker off. Plug in a pedestal tester or a portable EMS like the Progressive Industries EMS-PT30X, turn the breaker on, and read the result. You’re looking for correct polarity, a good ground, and voltage between about 108 and 132 V. Reversed polarity, an open ground, or a hot neutral means don’t connect; report it and move sites.
Leave the EMS in line between the pedestal and the trailer for the whole stay. A plain surge protector absorbs a spike but won’t disconnect on low voltage or a miswire; an EMS does. Plug in with the pedestal breaker off, then turn it on.
11. Pressure regulator on the water, valves set correctly
Thread a pressure regulator onto the spigot before the hose. Campground pressure can exceed 100 psi, and RV plumbing is typically designed for around 40 to 60 psi. A regulator set to the 40 to 50 psi range is the common target; your trailer manual may give a maximum.
Keep the grey valve closed until the tank has some volume, so it flushes when you dump. Keep the black valve closed always while connected. Leaving it open lets liquid drain away and leaves solids behind, which builds the pyramid that clogs the tank and fouls the sensors.
The first night
12. Detectors, panels, the 12 V disconnect, and the furnace
Press the test button on the smoke, LP, and CO detectors (some trailers combine LP and CO in one unit). Each should alarm. A dead detector on a new trailer is common after months on a lot with the battery disconnect off and the 12 V detector drained.
Find the 120 V breaker panel and the 12 V fuse panel, usually together in one distribution panel such as a WFCO or Progressive Dynamics unit. Note which breaker is the water heater element and which is the converter. Find the battery disconnect switch and know what it does and doesn’t kill; on many trailers the LP detector stays powered.
Run the furnace for a full cycle before you need it. If the blower runs but it never lights, the furnace guide has the test order.
Do not tow until these are right: trailer brakes that do nothing on the manual override test; a breakaway cable that isn't attached to the truck, or a breakaway test that doesn't drag the wheels; any light out on the 7-pin; lug nuts that haven't been torqued; or tires below the placard's cold pressure. Brakes, lights, and the breakaway are life-safety items. If a brake or wiring fault isn't a dirty plug or a blown fuse, have it fixed by an RV shop before the trip.
Symptom → likely cause
| What you notice on the first trip | Most likely | Check |
|---|---|---|
| Trailer pushes the truck on stops | Brake gain too low or no trailer brakes | Manual override test |
| Trailer wheels lock on stops | Gain too high | Turn down, retest at 20-25 mph |
| Wheel vibration or wobble after 50 miles | Lug nuts lost torque | Torque in a star pattern now |
| No hot water, element breaker trips | Element dry-fired | Bypass valves, tank full, element |
| Water spraying from a fitting | Campground pressure too high | Regulator, then the fitting |
| Converter dead after hookup | Pedestal miswire or surge | Pedestal tester, EMS log |
| Fridge warm on day one | Not pre-cooled or not level | 24 h pre-cool, level check |
Printable checklist
DAY BEFORE / DRIVEWAY
[ ] Tires at placard cold pressure: ____ psi
[ ] Lugs torqued, star pattern: ____ ft-lb (from axle/wheel manual)
[ ] Fridge on, empty, trailer level (24 h ahead)
[ ] Water heater bypass in NORMAL, tank full, hot tap runs steady
[ ] Anode installed (Suburban)
[ ] Fresh tank sanitized
[ ] Black tank: a few gallons of water; grey empty
[ ] Trailer height measured: ____ ft ____ in, label in truck
[ ] Propane: open / closed per route rules

HITCHING
[ ] Coupler latched and pinned, ball size matches
[ ] Safety chains crossed, slack but not dragging
[ ] Breakaway cable to the truck, not the chains
[ ] Breakaway test: pin pulled, wheels drag, pin replaced
[ ] 7-pin: running, left, right, brake, reverse
[ ] WDH bars on and tensioned (if used)
[ ] Brake gain set with manual override at 20-25 mph: gain ____
[ ] Mirrors extended

ON THE ROAD
[ ] Lugs re-torqued at ____ / ____ / ____ miles (axle manual schedule)

CAMPSITE
[ ] Chocks on both sides before unhitching
[ ] Level side to side, then front to back
[ ] Stabilizers snug, not lifting
[ ] Pedestal tested before connecting
[ ] EMS or surge protector in line
[ ] Pressure regulator on the spigot
[ ] Grey valve closed until it has volume
[ ] Black valve closed

FIRST NIGHT
[ ] Smoke, LP, CO detectors tested
[ ] Breaker and fuse panel located
[ ] Battery disconnect located
[ ] Furnace run one full cycle
Parts and tools mentioned
- Tire pressure gauge reading to at least 100 psi
- Torque wrench and the correct lug socket
- Wheel chocks (two per side) and leveling blocks
- Tekonsha P3, CURT Echo or Discovery, or similar proportional brake controller
- 7-pin trailer connector tester
- Progressive Industries EMS-PT30X or a Southwire Surge Guard portable EMS
- Water pressure regulator with gauge
- Tape measure for trailer height
Questions people ask next
Should I run the fridge on propane while towing? Many people do. Others close the cylinders and let a pre-cooled fridge coast; a full, cold absorption fridge holds temperature for several hours closed. Tunnel and ferry rules may decide it for you, and every propane appliance must be off at the fuel pump.
How tight should the hitch ball be? Tight to the torque printed in the ball or hitch instructions, which is commonly 250 ft-lb or more on a 2-5/16 in ball. See the WDH guide.
Do I really need an EMS if the campground is new? New pedestals get miswired too, and low voltage on a busy summer evening is common at any park. An EMS is the only thing in this list that protects the trailer from the campground.
Why does the dealer say to leave the black valve open at full hookups? Some do, and it’s wrong for the black tank. Liquids drain, solids stay. Close it, dump when it’s at least two-thirds full, and flush.
Photos

Manuals and references consulted
- Dexter Axle Operation Maintenance Service Manual (wheel nut torque and re-torque schedule)
- Lippert axle and wheel owner's information (lug torque, tire pressure)
- Trailer tire and loading information placard (49 CFR 571.110 / FMVSS 110)
- Tekonsha and CURT electric brake controller instructions (gain and manual override test)
- Suburban and Atwood/Dometic water heater installation and operating manuals
- Progressive Industries EMS and Southwire Surge Guard installation instructions
- NFPA 1192 Standard on Recreational Vehicles (LP and CO detector requirements)